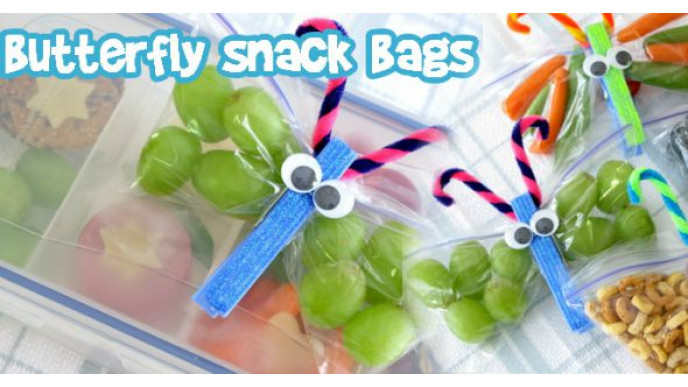
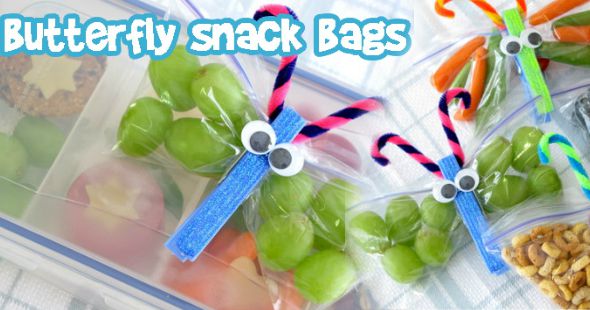
We are always looking for ways to make our kids' lunches a little more exciting without spending a fortune, right? Well what if I told you that you could make their lunch more exciting and save money!? With back to school just around the corner, I know this little do it yourself project will have you all interested. Try out these Butterfly Snack Packs to add some spunk to a lunch box as well as save you some money. If you do a lot of crafts with your kids then you may even have all of the items needed in your home already. If not, a quick trip to the dollar store or craft store is sure to get your items needed. These adorable little Butterfly Snack Bags are going to be the talk of the entire classroom, and by the picture I am sure you can see why.
You may be wondering how this little trinket will save money, but the answer is simple. You will save money by portioning out your own snacks rather than buying snacks prepackaged, which can be expensive. For example, if you want to fill the butterfly wings with carrots, Bolthouse Farms prepackaged snack size carrots are going to cost you about $1 each bag. If you buy a larger portion of carrots and portion them out yourself, these little baggies will cost you about $0.12 to fill. They are also a lot more fun!
So, here is what you're going to need to get started:
- pipe cleaners
- clothespins
- snack baggies
- google eyes
- glitter glue
Each of these butterfly snack baggies is going to cost you about $0.25, but you can use them over and over again. Even once you add in the cost of the actual snacks, you are still saving over 50% off the cost of the prepackaged snacks.
Here are the steps to make your adorable Butterfly Snack Baggies:
Step 1: Take some glitter glue in the colour of your choice and put a little bit on one side of a clothespin. You can cover the entire clothespin in glitter glue or paint if you like, for added colour. Then you can take two google eyes and stick them onto the clothespin. I would stick the eyes near the gripping half of the clothes pin. Let the little critter sit to dry for a bit, you may be able to take this opportunity to get a few other butterflies started.
Step 2: Get a snack sized baggie, preferably one with a zipper style closure and fill it up with a healthy treat for your little ones. Try not to over fill the baggie, you're going to want the snacks to leave enough space for the butterfly clothespin. Also try to get the snacks evenly spread on either side of the baggy.
Step 3: Take your decorated clothespin and clip it onto the snack baggie. You can either glue the pipe cleaner on as an antennae, or just clip it into the jaw part of the clothespin. I would probably glue it so that it doesn't get lost. Then you're going to want to clip the pipe cleaner to an appropriate length (or cut them in half prior to attaching them to reduce what is thrown out). Curl the edges with your finger or a pencil for the antennae look.
If you have a toddler or younger child, you could even fill one half of the snack baggie with one type of snack and the other half with another type of snack. I know my son will only eat 5-6 goldfish or grapes at a time so that would definitely be a way to reduce what is thrown out.
Tip: To save more money on this little do it yourself project I suggest you watch for snacks on sale, and Ziploc baggies too. It may be difficult to find clothespins at any retailer, but I had luck at both the dollar store and Walmart in the craft section actually.
To save money on the snack aspect, browse your local flyers before doing your grocery shopping and grab any snacks that your kiddo may enjoy that are on sale. I personally try to stick to healthy snacks but Mini Oreos or Teddy Grahams sometimes sneak into my shopping cart. The possibilities are quite virtually endless here.
We would love to see your finished Butterfly Snack Bags!