
If you're anything like me, you'll have a stack of clothes in your wardrobe that are just a little bit too snug. Most specifically, I have a LOT of old t-shirts which are just a bit tight in the belly, having been purchased and worn before I gestated two children. Now, I don't like to throw these tees out or donate them, because I still really like the designs - that's why I bought them in the first place.
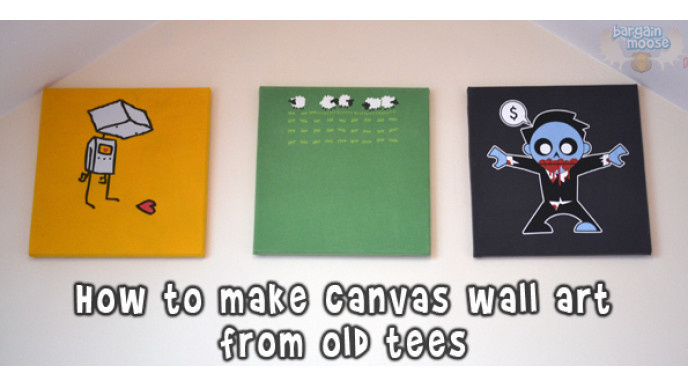
Most of my tees are from Threadless, they're colourful, interesting and fun. Instead of getting rid of them, I decided to make them into wall art, to decorate some of the areas of my home that were lacking in colour. I mounted the tees on canvasses, using nothing more than a simple pair of scissors and a staplegun. Some of the finished result is in the image above - and I am really pleased with them. It's a unique display that no-one else in the world has, they're all images I love, and it really brightens up the room.
In the following text, I will give you a rough tutorial on how to mount your old t-shirts on to canvas, to display on your walls.
What you will need:
- Old tees
- Canvasses
- Staplegun
- Sharp scissors
- Iron (optional)
The canvas size you choose depends on what size of clothing you're mounting, I went for 30cm x 30cm which suited my needs perfectly. If you're making a display of multiple tees on the wall, it also looks fantastic to intersperse it with a few rectangular canvasses too.
I'd recommend washing your old t-shirts before you start this canvas making process - don't use stinky sweaty ones!
Step 1: Cut the tee

When I put the scissors to the first tee, I was a bit nervous! I had only googled for a basic guide and I knew that a lot would be learned by trial and error as I made the canvasses. I chose a t-shirt I didn't care too much about, in case I made mistakes.
What you need to do - using your sharp scissors, cut up the side seams of your chosen t-shirt, so that you've just got the front panel to work with. There's less material and it makes things easier to manage.
Step 2: Iron the t-shirt

This is an optional step, but I'd recommend ironing the t-shirt before you make your canvasses. It will take out all the creases and give a better finished product. If the decal on your t-shirt is heat sensitive, make sure you only iron the back side of the material.
Step 3: Place your canvas

With the t-shirt face down, place your blank canvas over the area you'd like to show on the front of the piece of wall art. Use the neck line to try and center the canvas, if you like.
Fold over the bottom edge of the fabric along the bottom of the canvas. You can then pivot the canvas on its top edge and lift it up to check the placement of the decal. Remember, this isn't an exact science... you can get out the ruler and chalk if you wish, but I just did my measurements by eye.
Step 4: Start stapling the edges

When you're happy with the placement, put a few staples across the bottom edge of the canvas, securing the fabric in place. Pulling the fabric quite tight at the top edge, staple that down too. Tip: don't pull the material too tight, as it could cause striations and an uneven pattern on the front of the wall art.
Step 5: Trim and staple the corners

At this stage (after having down two sides), I found it beneficial to staple the 4 corners. It's good to trim off any excess material that is getting in the way, and then carry on with the stapling. There can be quite a bunch of material at the corners as you try and get it neat and tidy, so I found that trimming helped a lot. Fold it as neatly as you can, then staple. I found it similar to gift wrapping, in the way that I had to bend and fold the material.
Step 6: Staple the final sides

You're left with the last 2 sides now... just fold the material, tuck it in and staple to your heart's content. Remember, you can unpick your staples at any time if you're not happy with the t-shirt placement. Just re-align and re-staple!
Step 7: Tidy the back

Lastly, trim off any excess material you don't need. I didn't do anything special on the back of my canvasses as they're not going to be seen. I was able to tuck some of the loose edges in behind the canvas frame, but not all frames might allow you to do this. You could also finish off your mounted wall art by stapling a piece of thick card over the back, to hide the untidy trimmings, but I was happy enough with mine as they were.
Below, you can see the final image of the canvas in the above tutorial.
Final cost

All the t-shirts in the image above were bought in various sales over the years at Threadless, each costing only $10 or thereabouts. I purchased a job lot of blank canvasses on eBay so it worked out that the canvasses were about $4.50 each, including shipping. Therefore, each piece of unique wall art cost me less than $15. For you, you could also take a look for canvasses in dollar stores or at yard sales. Even if they've already got a print on them, you've covering them up - you really only need the basic shape and frame to work with.
Of course, if you don't have a staplegun, you'll have to invest in one of those. I wouldn't take that into account on the above costings, as that's something you'd buy and have for use on future projects.
What do you think?
Well, what do you think of the idea of wall mounting your old t-shirts and making it into art pieces for your walls? If you give it a try yourself, please take a picture and show us in the comments below!


Comments